Raising a Family on a Budget

Home Economics for Real Life

  • Facebook
  • Instagram
  • Pinterest
  • RSS
  • Twitter

Philadelphia Style Vanilla Ice Cream

Philadelphia Style Vanilla Ice CreamAn entire month dedicated to the celebration of ice cream?! Yes please!

July is National Ice Cream Month, and I’ve partnered with Nielsen-Massey Vanillas to bring you one of my favorite vanilla ice cream recipes.

Nielsen-Massey Vanillas is still a family run business, operated by the 3rd generation of Nielsens. They offer three different types of vanilla: Madagascar Bourbon, Mexican, and Tahitian, and all products are Gluten-Free, Allergen-Free, GMO-Free and Kosher.

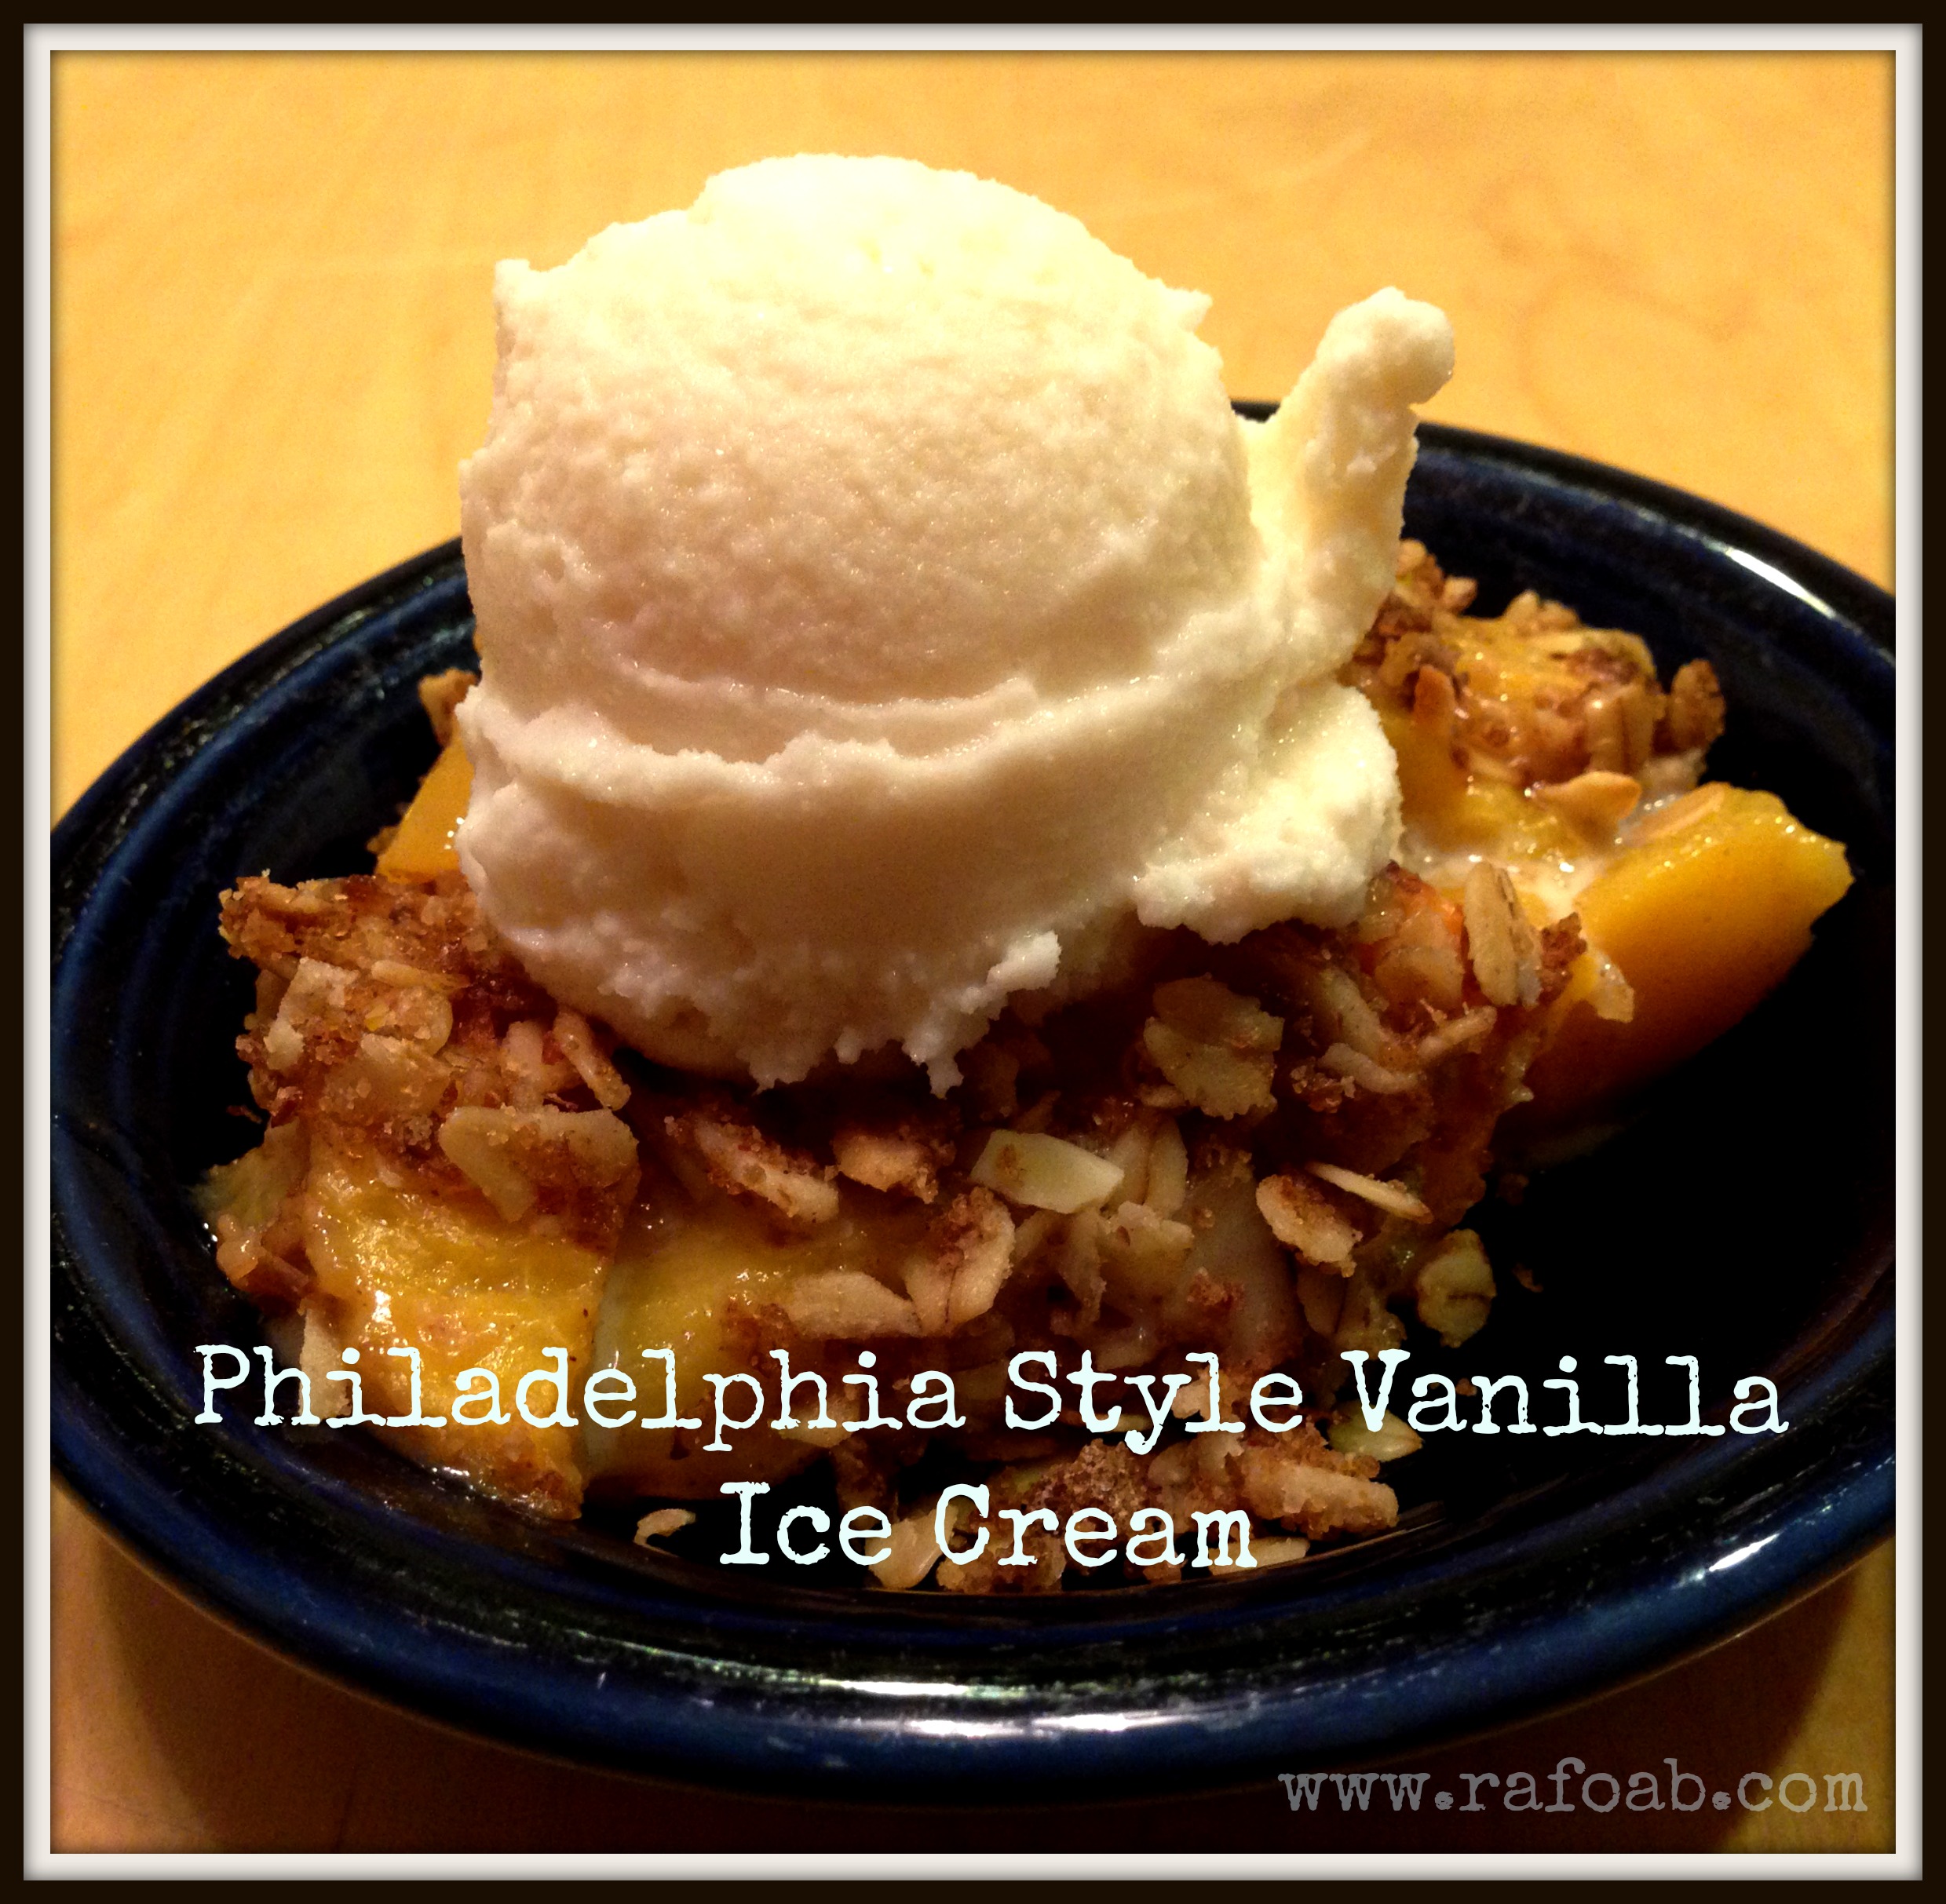
Usually, I go for chocolate ice cream, but when it comes to topping a fruity dessert like peach crisp, vanilla ice cream is the only way to go. Its delicious, and pairs beautifully with so many other flavors turning a regular dessert into something extraordinary.

Philadelphia style ice cream is one of the simplest to make and uses just a few basic ingredients – milk/cream, sugar, and flavoring – all things I have on hand in my kitchen. With a few basic ingredients, you can make your own homemade ice cream whenever that sweet tooth gets the better of you, and since it is homemade you control the quality of the ingredients.

For this ice cream, I am using my favorite – Madagascar Bourbon Vanilla. This is my go to vanilla for that classic vanilla flavor – Sweet, creamy and mellow with velvety after-tones.


Philadelphia Style Vanilla Ice Cream
2014-07-15 13:05:30
A deliciously creamy vanilla ice cream.
Write a review
Save Recipe
Print
Ingredients
  1. 2 cups Half & Half
  2. 1 cup of milk
  3. 3/4 cup sugar
  4. 1 Tbsp Nielsen-Massey Madagascar Bourbon Vanilla
Instructions
  1. Mix the ingredients together in a bowl. Make sure the sugar is fully dissolved so that your ice cream is not gritty. Chill the ice cream base for at least 3 hours.
  2. Prepare your ice cream maker according to the manufacturer's instructions. Add your ice cream base to bowl of your ice cream maker and process until it reaches the desired creaminess.
  3. Serve immediately, or transfer into a container and freeze for 3-4 hours until it firms up.
Notes
  1. Do not use homemade vanilla extracts when making ice cream. The alcohol content of homemade extracts is higher, and will prevent the ice cream from freezing properly.
Raising a Family on a Budget http://www.raisingafamilyonabudget.com/
     

Enter below for a chance to win a bottle of Nielsen-Massey Madagascar Bourbon Vanilla.

Entry-Form


Affiliate Disclaimer

{Recipe} Homemade Buffalo Sauce & Buffalo Chicken Grilled Cheese

I am having some very odd cravings lately, and today’s hit around 7am – Buffalo Chicken!  I don’t care for most prepared buffalo sauces because they taste very vinegary to me, so I opted to make my own.  Here is the recipe for anyone looking to try a new Buffalo Sauce – maybe in time for the Superbowl this weekend!

:: Buffalo Sauce

  • 1/2 c Frank’s Red Hot
  • 1/3 c butter
  • 1 tsp Garlic Powder (add more if you like it garlicy)
  • 1 bay leaf
  • 1 1/2 tsp Worcestershire Sauce
  • 1/4 tsp Cayenne Pepper (more if you like heat, I only used a 1/4 this time but will add more when I make this again)

Melt the butter in a small pot.  Reduce the heat to low.  Add the spices and stir them in so you don’t get lumps.  Add the bay leaf.  Then, carefully pour in the Frank’s Red Hot.  If the butter is boiling before this point, remove from heat so that it doesn’t bubble out of the pot and burn you.  Whisk everything together and allow to simmer 1-2 minutes.  Remove the bay leaf, and use on wings or as a dipping sauce or in your favorite recipe!

For me, that became a Buffalo Chicken Grilled Cheese!

buffalo grilled cheese

I was making a buffalo chicken grilled cheese & a regular grilled cheese which is why there are 2 sandwiches in the photo.

:: Buffalo Chicken Grilled Cheese

  • 1 cooked chicken breast, diced or shredded
  • enough buffalo sauce to coat the chicken
  • 4 slices of sourdough bread
  • Bleu Cheese Dressing (I like Marzetti’s Ultimate Bleu Cheese)
  • Bleu Cheese crumbles (optional) – to taste
  • 8 slices of sharp cheese – I used Cooper Sharp from the deli
  • butter for cooking

In a bowl, combine the cooked chicken breast and the buffalo sauce to coat.  Stir in the bleu cheese crumbles (if using) and 1 spoonful of the bleu cheese dressing.  If you don’t care for bleu cheese dressing, you could use ranch or mayo.  Stir so everything is mixed together.

Build your sandwich.  Two slices of cheese on the bottom, a layer of buffalo chicken, and 2 more slices of cheese on top.  Butter the top slice of bread, but don’t put on the top slice  just yet.

In a frying pan, melt some butter.  Place the open-face sandwiches in the pan and cover with a lid.  Cook on med-low until the cheese starts to melt and the bread is getting toasty. Put the second piece of bread on each sandwich, and flip.  Cook on the second side until the bread is toasty and all of the cheese is melted.

Allow sandwiches to cool for 1-2 minutes before slicing.  Serve with additional bleu cheese dressing for dipping.  I never said this was healthy or low fat.  

You can also make mini sandwiches using the appetizer breads that you can find at the deli and have a spin on the usual buffalo wings for the big game!


Moroccan Chicken Tagine

At my husband’s Christmas party a few weeks ago, they had a delicious Moroccan Chicken dish.  I loved the sweet heat and warm earthy spices that I just had to try it on my own.  After a little grocery shopping for a few spices, I decided that today was the day to make this hearty dish.

Tagines in Moroccan cuisine are slow-cooked stews braised at low temperatures, resulting in tender meat with aromatic vegetables and sauce.  Since tagines are usually cooked in earthenware over low heat for a long period of time, a slow cooker is a fair replacement for the cooking vessel however, it leads to a few more steps in the cooking process, such as browning the meat first and building the sauce before adding it to the pot.


Holy mise en place!

[Read more…]

Recipe: Cheesy Sausage Muffins

Cheesy Sausage Muffins

Last winter, I received the $5 Dinner Mom’s Breakfast & Lunch Cookbook, and this was one of the first recipes I tried out in writing my review of the book.  This has quickly become one of my favorite cookbooks, and my favorite freezer friendly breakfast.

As we prepare to receive our side of beef in the next few weeks, I am busily using up items in the freezer.  Today I decided to use up the sausage and cheddar cheese that have been in there.  This recipe scales beautifully.  I made a triple batch of these with the intention of freezing them for breakfasts for the next 2 weeks.

Cheesy Sausage Muffins
2014-08-14 17:38:30
Yields 12
Write a review
Save Recipe
Print
Ingredients
  1. 1/2 lb bulk pork breakfast sausage
  2. 2 cups of AP flour
  3. 2 tsp baking powder
  4. 1 tsp salt
  5. 2 eggs
  6. 1/4 cup oil
  7. 1 cup milk
  8. 1 cup shredded sharp cheddar cheese
Instructions
  1. Preheat the oven to 350 degrees.
  2. Line muffin tin with paper liners.
  3. In a large skillet, brown the sausage, crumbling as you cook it.  Drain and set aside to cool.
  4. In a large mixing bowl, whisk together the dry ingredients.  Make a well in the middle, and pour in the eggs, oil and milk.  Mix until a batter just forms.  Fold in the sausage crumbles and shredded cheese.
  5. Fill the prepared muffin wells to the top with batter.  Bake in the preheated oven for 18-22 minutes, or until they begin to turn golden on top.
  6. Serve warm with fresh fruit for breakfast or with soup for a light lunch or dinner.
Notes
  1. To freeze the muffins, make sure they cool completely, then place in a freezer bag. Place in the freezer. When you are ready to have the muffins, allow to defrost on the counter, and then warm them up in either the oven or microwave.
Raising a Family on a Budget http://www.raisingafamilyonabudget.com/

Tiramisu Italiano

I had the hardest time deciding which recipe to share for today’s Tasty Tuesday.  A few people chimed in and said that they were interested in the Tiramisu recipe I had mentioned so I’m going to go with that. I am making this for a dinner party this weekend, so a photo will be up on Saturday.  For now just use your imagination!

Tiramisu Italiano

7 egg yolks
1/2 cup sugar
1/3 cup marsala, plus 2 tablespoons marsala
8 ounces mascarpone, softened
1 cup heavy cream
1 cup brewed espresso
1 ounce dark chocolate
1/4 cup rum
1 teaspoon vanilla extract
48 ladyfingers (usually 2 packs)
1/4 cup cocoa powder (for the top) or 1/4 cup chocolate curls (for the top)

Cream together egg yolks & sugar in a heatproof bowl set over a pot of simmering water. Add 1/3 cup of the marsala and continue to whisk until the mixture is thick and doubled in volume (I use my hand mixer for this so I don’t get tired of whisking, and it gets more air into the eggs). Remove from heat, and stir in the mascarpone until completely blended.

In a chilled bowl, whip the heavy cream to soft peaks. Fold the whipped cream into the mascarpone mixture to lighten.

In a small saucepan, combine the espresso, chocolate, rum, vanilla, and remaining 2 Tbsp of marsala. Heat gently and stir to melt and incorporate the chocolate. Then, chill the mixture to cool it down, about 15 minutes.

Quickly dip each lady finger into the coffe mixture and arrange ina single layer on the bottom of a 9×13 inch glass baking dish. Do not soak the cookies or they will become too moist. Spread half of the mascarpone cream evenly over the dipped lady fingers. Repeat with a second layer of dipped lady fingers and remaining macarpone cream.

Top with either cocoa powder or shaved chocolate. Refrigerate for at least 2 hours before serving so everything will set up. You can even make it the day before and the lady fingers will get soft and cake-like.

Toffee Popcorn

I enjoy baking and cooking.  I am not intimidated by different ingredients or techniques.  So this past Christmas, I decided to stray from the usual cookie marathons, and make candy as gifts instead.  The most popular treat I made this year…Toffee Popcorn!

::Ingredients

  • 10 cups popped popcorn (12 cups if not using nuts)
  • 1 cup pecan halves, toasted (optional)
  • 1 cup whole unblanched almonds, toasted (optional)
  • 1 1/2 cups packed brown sugar
  • 1 cup butter
  • 1/2 cup honey
  • 1/2 teaspoon cream of tartar
  • 1/2 teaspoon baking soda
  • 1/2 teaspoon vanilla extract

In a large bowl, combine popcorn and nuts.

In a heavy saucepan, combine the brown sugar, butter, honey and cream of tartar; stir until the butter is melted and the sugar is dissolved. Cook, without stirring, over medium heat until a candy thermometer reads 300°-310° (hard-crack stage).

Remove from the heat.  Stir in vanilla and baking soda until mixture is light and foamy (be careful – when you add the vanilla it will spontaneously boil, so pour it in and step back to avoid the spatter). Immediately pour over popcorn mixture; toss gently using two buttered spatulas or wooden spoons. Spread into two baking pans lined with Silpats or buttered parchment. Press gently to flatten. Cool completely. Break into pieces.

Yield: about 2 quarts.

NOTE: There is a reason that sugar work is referred to as culinary Napalm.  Be careful when cooking and working with your toffee.  Keep a bowl of cold iced water near by at all times so if you get any of the toffee on you, you can instantly plunge your hand into the water.

Copyright © 2025 · Lifestyle Pro Theme on Genesis Framework · WordPress · Log in