Raising a Family on a Budget

Home Economics for Real Life

  • Facebook
  • Instagram
  • Pinterest
  • RSS
  • Twitter

Creating A Household Notebook: Part 1


Originally posted January 2011.

I have been spending the last few weeks researching household notebooks, and all of the things that people tend to put in them.  Depending on just how much of a Type A person you are, you will either love or hate the idea of a household notebook, but there are bound to be components of it that will work for you and your family.

What is a Household Notebook?

A Household Notebook (also called Home Management Notebooks or Family Organizers) is a command center for an entire family.  Therefore, what works for one family, may not work for another family because each family is unique.

What do you include in a Household Notebook?

Anything that helps your household run smoother can be included!  The idea is to have a centralized reference guide as a way of answering the biggest questions about your household and family.  A few possible suggestions:

  • Calendar/Planner
  • Daily Schedules
  • Blank Notepad
  • Weekly/Monthly Menu Plans
  • Shopping Lists
  • Freezer/Pantry Inventory
  • Take-Out Menus
  • Important Phone Numbers
  • Important Dates
  • Baby-Sitter Info Page
  • Medical Information Sheets
  • Church Bulletins
  • Volunteer Obligations
  • Carpool Schedules
  • Sports/Extracurricular Schedules
  • Homeschool Lesson Plans
  • Home Management & Finance
  • Home Repair Records
  • Automotive Repair/Mileage Logs

What materials will I need to get started?

You will want to start with a 3-ring binder (smaller is better and will keep you from going overboard), some tabbed dividers, and clear page protectors.  These are the basics.  Look through your child’s unused school supplies, and you may find everything you need right there, otherwise check out your local dollar store to see what they have before hitting up your local big box store.

End of Part 1 Homework:

Think about what sections you would like to include in your Household Notebook.  Each notebook is going to be different based upon the needs of your family.  If you are on Weight Watchers, you may want to include the Point values for your favorite foods; or if you love to entertain you may want to include a wine list to keep track of what you like and don’t like for quick reference before a party (also good if anyone ever offers to pick something up for you to have a quick reference); or if you are “cookie mom” or “popcorn mom” for your child’s scout troop you may want to keep your inventory lists and sales records with your Household Notebook.  Brainstorm the possibilities, but remember not to include everything.  Your goal is to have a concise reference guide that you can quickly go through, find what you need, and move on.  A 3-inch binder that is bursting at the seams is no more of a resource than War and Peace is a beach read.

Summer Sangria Recipe


I love to entertain and have people over.  I don’t like to spend a lot of money just to be able to visit with friends and family.

One way to save money when you are entertaining is to offer one “house drink” instead of a full bar. I love spiked punches and sangria because they don’t contain all alcohol and you can use the less expensive items to stretch the volume, such as sodas and juices. You can also often get away with a less expensive wine and still have a delicious result without breaking the bank.

For our 4th of July BBQ, I will be making a pitcher of Sangria.  I am going to Trader Joe’s today, so I will be picking up 2 bottles of “2 Buck Chuck” for today’s batch of Sangria.  I like my Sangria on the sweeter side, so I often make this with both white zinfandel, and either Merlot or Cabernet.  However, you can use whatever you like and have on hand.

This is my favorite Sangria recipe.  You can modify it to meet your tastes and it scales up for a crowd very easily.  I have even been known to add a little more of the soda to get it to stretch just a tiny bit farther and no one has ever been able to tell.

:: Sangria Recipe

3 cups of wine
1 1/2 cups Sprite or 7-up
1 1/2 cups orange juice
1 orange thinly sliced
1 lime thinly sliced
1 lemon thinly sliced
1/2 cup brandy – I don’t usually have this on hand, and it is just as good without it
1/4 cup sugar
2 tablespoons Cointreau
2 tablespoons grenadine
2 tablespoons fresh lemon juice
2 tablespoons fresh lime juice
ice cubes

Stir wine, soda and orange juice, 8 lime slices, 8 lemon slices, orange slices, brandy, sugar, Cointreau, grenadine, lemon juice and lime juice in a large pitcher to combine.  Chill for at least 30 minutes.  Serve in wine glasses garnished with additional citrus slices.

Serves 8.

Getting By On One Car

I am a stay-at-home mom with 2 children.  My husband Steve works for Princeton Univ, about 15 miles each way from our home.  We do not live on a main public transit line, however we are lucky in that we have a produce market, library, 7-11, and a few other small stores all within walking distance from our home.  On nice weather days, we can even walk to the playground. However, I am used to being on the go 2-3 days a week with playgroup, shopping trips or just visiting friends.

At the end of January, my engine decided that it no longer wanted to cooperate.  We were on our way to my parent’s house to drop the kids off before going to the Philadelphia Home Show, and were just before exit 57 on 295 south when my car’s engine started making a horrible noise.  We got off the highway and into the parking lot of an Acme when the engine died altogether.  Luckily, Steve was driving because if it had been just the kids and I, I would have lost my mind.

Not a single light came on indicating a problem.  No low oil pressure light.  No check engine light.  Nothing.

We managed to get the car home, parked it in the driveway and that is where it sat until yesterday morning.  Steve took my car to the mechanic, and today we got the dreaded phone call.  I need a new engine.  My car was 5 years old in December, has less than 70K miles, and it needs a new engine to the tune of about $4,500!  OUCH!

While we make do every month, and bills get paid, we only get one pay check a month, and we don’t have a ton in savings.  So there is no way to pay for the repairs in cash.  We also don’t have credit cards to put the $4,500 on the plastic and keep moving forward.

Now the decision is to go down to one car – either selling Steve’s truck to repair my car and then having just one vehicle between the two of us, or bringing my car home and taking time over the next several months to try and fix it ourselves with me attempting to learn how to drive a manual transmission in the process.

Either way we are staring down the barrel of being a one car family, and unfortunately not by choice.  Are there any other families out there that get by on one car?  I’d love to hear how you do it, and any advice you have for doing it long term.

Also, if there is anyone out there who wants to sponsor this website by providing me with a car to drive for the next few months (or who would be interested in fixing my car for the cost of parts in return for advertising), I’d be all for making a joint marketing arrangement.  You provide the wheels, and I’ll provide you with a review of the vehicle, your company/dealership and my experience, and advertising on this site.  I can be contacted at email hidden; JavaScript is required

Tiramisu Italiano

I had the hardest time deciding which recipe to share for today’s Tasty Tuesday.  A few people chimed in and said that they were interested in the Tiramisu recipe I had mentioned so I’m going to go with that. I am making this for a dinner party this weekend, so a photo will be up on Saturday.  For now just use your imagination!

Tiramisu Italiano

7 egg yolks
1/2 cup sugar
1/3 cup marsala, plus 2 tablespoons marsala
8 ounces mascarpone, softened
1 cup heavy cream
1 cup brewed espresso
1 ounce dark chocolate
1/4 cup rum
1 teaspoon vanilla extract
48 ladyfingers (usually 2 packs)
1/4 cup cocoa powder (for the top) or 1/4 cup chocolate curls (for the top)

Cream together egg yolks & sugar in a heatproof bowl set over a pot of simmering water. Add 1/3 cup of the marsala and continue to whisk until the mixture is thick and doubled in volume (I use my hand mixer for this so I don’t get tired of whisking, and it gets more air into the eggs). Remove from heat, and stir in the mascarpone until completely blended.

In a chilled bowl, whip the heavy cream to soft peaks. Fold the whipped cream into the mascarpone mixture to lighten.

In a small saucepan, combine the espresso, chocolate, rum, vanilla, and remaining 2 Tbsp of marsala. Heat gently and stir to melt and incorporate the chocolate. Then, chill the mixture to cool it down, about 15 minutes.

Quickly dip each lady finger into the coffe mixture and arrange ina single layer on the bottom of a 9×13 inch glass baking dish. Do not soak the cookies or they will become too moist. Spread half of the mascarpone cream evenly over the dipped lady fingers. Repeat with a second layer of dipped lady fingers and remaining macarpone cream.

Top with either cocoa powder or shaved chocolate. Refrigerate for at least 2 hours before serving so everything will set up. You can even make it the day before and the lady fingers will get soft and cake-like.

Toffee Popcorn

I enjoy baking and cooking.  I am not intimidated by different ingredients or techniques.  So this past Christmas, I decided to stray from the usual cookie marathons, and make candy as gifts instead.  The most popular treat I made this year…Toffee Popcorn!

::Ingredients

  • 10 cups popped popcorn (12 cups if not using nuts)
  • 1 cup pecan halves, toasted (optional)
  • 1 cup whole unblanched almonds, toasted (optional)
  • 1 1/2 cups packed brown sugar
  • 1 cup butter
  • 1/2 cup honey
  • 1/2 teaspoon cream of tartar
  • 1/2 teaspoon baking soda
  • 1/2 teaspoon vanilla extract

In a large bowl, combine popcorn and nuts.

In a heavy saucepan, combine the brown sugar, butter, honey and cream of tartar; stir until the butter is melted and the sugar is dissolved. Cook, without stirring, over medium heat until a candy thermometer reads 300°-310° (hard-crack stage).

Remove from the heat.  Stir in vanilla and baking soda until mixture is light and foamy (be careful – when you add the vanilla it will spontaneously boil, so pour it in and step back to avoid the spatter). Immediately pour over popcorn mixture; toss gently using two buttered spatulas or wooden spoons. Spread into two baking pans lined with Silpats or buttered parchment. Press gently to flatten. Cool completely. Break into pieces.

Yield: about 2 quarts.

NOTE: There is a reason that sugar work is referred to as culinary Napalm.  Be careful when cooking and working with your toffee.  Keep a bowl of cold iced water near by at all times so if you get any of the toffee on you, you can instantly plunge your hand into the water.

Homemade Beef Stock

I’ve decided to add a new feature to Raising A Family On A Budget called Tasty Tuesday.  On Tasty Tuesday, I will be sharing a recipe that I have recently made for my family.  This week’s recipe is a basic, but something I have never made before…Beef Stock.

As I mentioned in the fall, we purchase our beef by the side from a local farm about 20 minutes from our home.  The cattle are grass fed and raised following completely organic measures.  We love buying our beef this way, but there is just one problem…No room in the freezer for anything else!

I am completely out of chicken and want to pick up a few packages to have on hand for the remainder of the month, but there is no room in the freezer because of all of the beef.  My fix…take the large box of soup bones & make beef stock!

I have a lot of soup bones, but you can scale this recipe to meet the needs of your family and the amount of stock you want to make.

:: Beef Stock

15 lbs of beef shank bones
4 large carrots, large chop
4 small onions, large chop
5 ribs of celery, large chop
5 cloves of garlic, cut in half
1/2 cup of red wine (whatever you have on hand will work or use water)
9 qts water (36 cups)
1 Tbsp kosher salt
25 peppercorns
6 bay leaves
1 Tbsp dried thyme, crushed
2 Tbsp dried parsley, crushed

Place your soup bones in a shallow pan and roast in a 450 degree oven for 40 minutes, turning once, to brown the meat/bones.

Prepare all of your additional vegetables, herbs, and spices in a large bowl.

When the bones are done roasting, put them in a large stock pot (at least a 10 qt pot).  Deglaze the roasting pan with the red wine, making sure to scrape up all of the browned bits on the bottom of the pan.  Pour the wine and drippings into the stock pot.

Add all of your vegetables, herbs and spices.

Fill the pot with 9 qts of water and put on high heat until it comes to a boil.  Turn the heat to low, and simmer covered for 3 1/2 hours.

Remove the soup bones, and if desired, cut off the meat for later use.

Strain the broth to remove the vegetables and other bits.  Use either a fine sieve or a colander lined with a double layer of cheese cloth.

To clarify the stock, mix together 1 egg white and 1/2 a cup of water.  Pour into hot stock & stir.  Bring to a boil.  As soon as a boil is reached, remove from the heat and allow to sit for 5 minutes before straining through a double layer of cheese cloth.

Store the stock in the fridge for up to 3 days or in the freezer for up to 9mos.

Makes about 8 qts of stock & 4-6 cups of meat depending on the amount of meat on your bones. And, don’t let those bones go to waste…doggies love them!


Homemade Breakfast Sausage

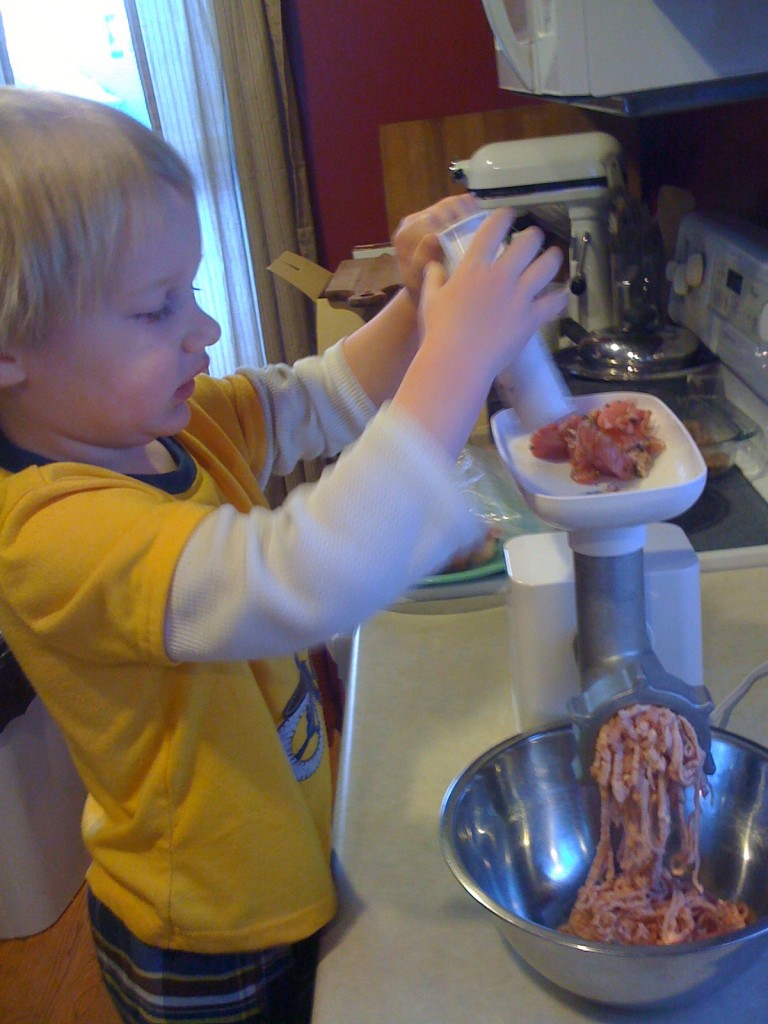
Homemade sausageIn preparing to write a review for The $5 Dinner Mom Breakfast and Lunch Cookbook, I went grocery shopping for a few key essentials.  I had left my purse at home, and only had $40 cash in my pocket, so spending $4+ for a 1 pound package of bulk breakfast sausage was out of the question.  I quickly looked up a recipe from my phone on how to make homemade sausage and opted on buying 2lbs of pork at $1.99/lb and a packet of marjoram for 99 cents to make my own instead!

:: Homemade Breakfast Sausage

2 teaspoons dried sage
2 teaspoons salt
1 teaspoon ground black pepper
1/4 teaspoon dried marjoram
1 tablespoon brown sugar
1/8 teaspoon crushed red pepper flakes
1 pinch ground cloves
2 pounds pork – I used very lean boneless loin chops

Cut the pork into small pieces, about the size of dice.  Place in a large zip top bag, and add all of the herbs, spices, and sugar.  Massage the meat in the bag so that all of the spices are mixed in and covering the bits of pork.  Stash in the refrigerator for at least 2 hours.

Assemble your meat grinder using the coarse grind plate.  Put all of the pork in the hopper on top of the grinder.  Slowly push the meat through the shoot, and catch the already ground pork in a bowl.  Do this at least twice to break down the meat.

Then form into patties and fry in a little oil  (it is very lean meat) until browned and cooked through, or cook as crumbles for use in recipes.  Two pounds of cooked sausage crumbles is approximately 5 cups of crumbles.

If you do not have a meat grinder, purchase 2lbs of ground pork, mix the spices into it, and allow to chill for at least 2 hours.  Proceed as outlined in the recipe.

This makes a very mild flavored breakfast sausage, but it is absolutely delicious, and I will make it again.

Peppermint Hot Cocoa Recipe

Need something to do with all of those candy canes from Christmas?  Want a tasty way to warm up after shoveling the snow?  Make yourself some peppermint hot cocoa!

Homemade Peppermint Hot Cocoa
4 cups milk
2 ounces chocolate chips – the minis melt faster, but all work well, even Hershey’s Kisses in a pinch!
4 peppermint candy canes, crushed to powder
1 cup whipped cream
4 small peppermint candy canes

In a saucepan, heat milk until hot, but not boiling. Whisk in the mini chocolate chips and the crushed peppermint candies until melted and smooth. Pour hot cocoa into four mugs, and garnish with mounds of whipped cream and Christmas sprinkles. Serve each with a mini candy cane stirring stick.

If you don’t have the above ingredients on hand, but still want a mug of peppermint hot cocoa, just crush up a left over candy cane from Christmas, and stir it into your favorite cocoa mix.  If you were given peppermint bark, stir a piece of that into your hot cocoa instead for an extra chocolatey pepperminty kick!

All variations of this cocoa are amazing!

So Much Produce, So Little Time

This year my friend Colleen & I joined Honey Brook Organic Farm in Pennington, NJ.  Honey Brook Organic Farm is a CSA (community supported agriculture) which means that a farmer offers a certain number of “shares” to the public for a flat membership fee and in return the member receives a “box” of seasonal produce each week during the growing season.  At Honey Brook Organic Farm they offer 3 different types of memberships — individual share (food for 2 people), a family share (food for 4-6), and a boxed share (food for 4, picked up at a location other than the farm).  Since the farm is in NJ, the growing season typically lasts from late May through early November, but that is completely contingent on the weather and Mother Nature.  Some years start earlier, some start later, and the bounty each week varies depending on the heat, amount of rain, early frosts etc.

This is my 3rd year being a member at Honey Brook Organic Farm, with a 2 year break in the middle because I moved to PA.  During those 2 years, I missed the farm and the seasonal produce.  I attempted to purchase all organic produce from stores like Wegmans & Whole Foods, but the prices started to get expensive, spending more than $25 a week where the farm membership worked out to about $16 a week.

So far this season, we have received Strawberries, Lettuce, Broccoli, Chard, Kale, Onions, Cabbage, Scallions, Beets, Potatoes, Sweet Corn, Peas, Collard Greens, Garlic, and Tomatoes (and probably some other veggies that I am forgetting since there have been so many).  A few weeks ago there was an abundance of broccoli, and those with a family share got 10 heads!  That week, we had broccoli with dinner, made broccoli & cheese quiche, and blanched & froze the rest for another day.  When the strawberries were particularly ripe and beautiful, we were able to get 2 quarts, and they became some of the most delicious jam (I still have 2 jars in the pantry, but my son will polish those off before too long).  This weeks over abundant crop — tomatoes!  After eating them sliced with salt & pepper, having grilled cheese & tomato sandwiches, and slicing them up for burgers over the past few weeks I needed to try something new.  Colleen shared her bruschetta recipe with me, and I’m in love.  Now to figure out a way to can it so I can have fresh bruschetta in the dead of winter.

CSA are the best bet when it comes to produce.  You are supporting local farms, and eating seasonally.  The produce tastes better than anything you can purchase in a grocery store, and is cheaper than the organic produce you find in other places.  The only limitations are mother nature and what can be grown in your region.  Many CSAs are sold-out for the current growing season, but now is a great time to check out their websites, and preview what each CSA has to offer.  Get on their mailing lists, and decide to support your local farms next year.  In the interim, support local farm stands, grow your own produce or create a produce share with friends.  With sustainably grown produce we all will benefit!

For more information on CSAs or to find a CSA in your area visit Local Harvest.

For more information about Honey Brook Organic Farm in Pennington or Chesterfield, NJ, go here.

« Previous Page

Copyright © 2025 · Lifestyle Pro Theme on Genesis Framework · WordPress · Log in